The information below is for staff
Looking for information relevant to students? Click the 'Collaborate Ultra for Students' button to find out more.
Learning@Griffith Help in Canvas
We have a brand-new help website for the new LMS Canvas, with access to further support from 24/7 call and chat lines.
Overview
Blackboard Collaborate Ultra is a web conferencing tool designed specifically for education and training. As an instructor using Collaborate Ultra, you can utilise a range of communication and collaboration features to present content and engage with students for a rich online learning experience.
Preparing for sessions
Creating links to Collaborate Ultra
To give students access to Collaborate Ultra in your Learning@Griffith course site, you will need to create a link to the tool in the left-hand course menu or a content area. Please visit our Creating links to Collaborate Ultra support page for instructions on how to do this.
Creating and editing sessions
To create a session:
- Navigate to the Collaborate Ultra area in your course site
- Click the grey Create Session button
- Name the session at the top of the panel
- In the Event Details tab, fill in the required information for your session
- Click the cog icon toward the top right of the panel to access the Session Settings tab
- Review and edit the session settings as required
- If you want to give students the option of downloading recordings as .mp4 files, click the Allow recording downloads checkbox under Recordings.
- If you want to increase the maximum capacity of the session to 500 total users, tick the Allow 250+ attendees to join checkbox under Large scale session (250+). Please note large scale sessions can be no longer than 24 hours and some participant permissions are disabled (see Blackboard’s Large Scale Session information for further detail).
- Click the Create button
To edit the event details or sessions settings for an existing session:
- Navigate to the Collaborate Ultra area in your course site
- Locate the relevant session and click the ellipses (...) on the right, then click Edit settings
For further information on event details and session settings please visit Blackboard’s Create and Edit Sessions and Session Settings support pages.
Guest access (optional)
In some cases, you may need to provide access to a Collaborate Ultra session for users who are not enrolled in the course site the session is being run from. To facilitate this, you would need to provide these users with a guest link to the session. To obtain and manage guest links:
- Navigate to the Collaborate Ultra area in your course site
- Locate the relevant session and click the ellipses (...) on the right, then click Edit settings
- Ensure the Guest access checkbox is ticked and the Guest role is set to 'participant'
- The Guest role can be set to 'Presenter' or 'Moderator' if you are providing guest access to an external who will be presenting in the session
- Click Save at the bottom of the panel to save the changes
- Click the icon to the right of the Guest link box to copy the guest link to your clipboard
- Paste the link wherever you will be providing access to the session
Pre-loading session content (optional)
If you wish to pre-load content into your session (for example, a PowerPoint file) before the session is due to begin:
- Navigate to the Collaborate Ultra area in your course site
- Locate the relevant session and click the ellipses (...) on the right, then click Edit settings
- Edit the start time so the session is open now and click Save at the bottom of the panel
- Join the session (see Joining sessions below for instructions)
- Access the Share Content tab (see Sharing content below for instructions)
- Click Share Files
- Add the file(s), wait for them to finish uploading, then exit the session
- Click the ellipses (...) on the right for the relevant session again, then click Edit settings
- Edit the start time to what it was before the change and click Save
Conducting sessions
Joining sessions
To join a session:
- Navigate to the Collaborate Ultra area in your course site
- Click the title of the session
- Click the Join Session button in the right-hand panel
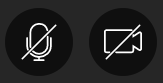
Sharing audio and video
Collaborate Ultra allows you to share your camera and microphone so your students can see and hear you during a session. Your browser should automatically prompt you to allow access to your camera and microphone for this purpose. Once these permissions are allowed, you can share your audio and video using the buttons at the bottom of the session:
For further information on the setup and use of audio and video in Collaborate Ultra, please visit Blackboard's Audio and Video support page.
Starting and stopping recordings
If you want to record your session for students to view later, you must start and stop the recording manually. To do this from within a session:
- Click the burger menu (three horizontal lines) in the top left-hand corner of the session
- Click 'Start Recording' or 'Stop Recording'
For further information about recordings and recording management, please visit Blackboard’s Recordings support page.
Sharing content
During a Collaborate Ultra session, you can share various types of content. To access the Share Content panel:
- Click the purple ribbon in the bottom right-hand corner to open the Collaborate Panel
- Click the Share Content tab at the bottom of the panel (third tab)

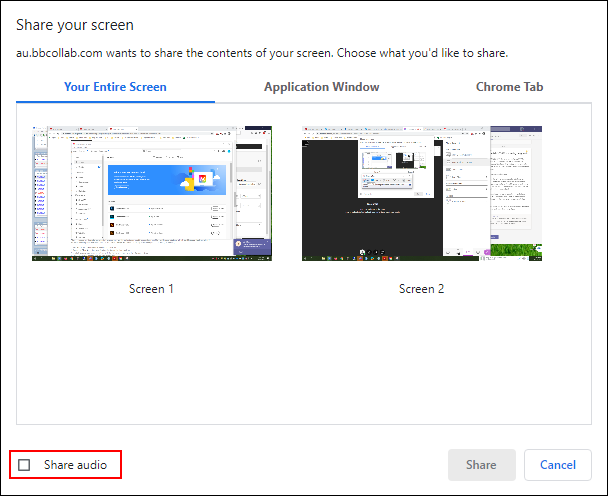
When using the application/screen sharing feature, please consider the following:
- Application/screen sharing is not currently available in the Safari (correct as at April 2021).
- Students will only hear computer audio (for example, audio from a YouTube video) if you are using Google Chrome
- You must tick the Share audio checkbox when selecting which screen or tab to share in the Share your screen window (see image below)
- Audio sharing works on Mac and Windows operating systems if you are sharing a Chrome tab, but audio sharing is only available when sharing a screen if you are using the Windows operating system
- Application/screen sharing requires more network bandwidth and device resources. See the Best Practices for Application Sharing article for further information.
For more information on sharing various types of content in Collaborate Ultra, please visit Blackboard's Share Content support page.
Recordings
Accessing recordings
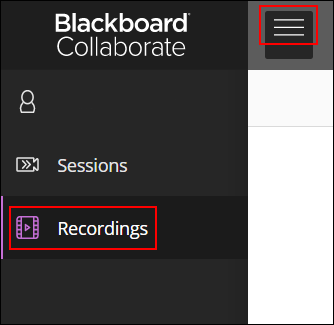
- Click the burger menu in the top left of the area
- Click Recordings
- Locate the recording you want to view and click the ellipses (...) on the right
- Click Watch Now to watch the recording in your browser
- Click Download to download a copy of the recording to your computer
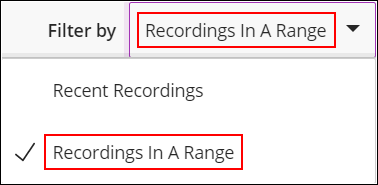
Can't find a recording?
If you are looking for a recording that was made more than 30 days ago, you will need to change the display filter from Recent Recordings to Recordings In A Range.
- Click the Filter by drop down menu and select Recordings In A Range
- Extend the date range as far back as necessary in the left box
Enabling recording downloads for students
When a recording has finished processing, instructors always get the option to download the recording in .mp4 format. However, students will only be able to download recordings if the Allow recording downloads box is ticked in the session settings. If you need to change this setting after a session has ended:
- Navigate to the Collaborate Ultra area in your course site
- Change the Filter By setting to All Previous Sessions on the right hand side
- Locate the relevant session in the list and click the ellipses (...) on the right, then click Edit settings
- **Change the session end to a date and time in the future
- Switch to the Session Settings tab by clicking the cog icon at the top of the right-hand panel
- Tick the Allow recording downloads box
- **Switch back to the Event Details tab by clicking the page icon at the top of the right-hand panel
- **Change the session end to 1 minute from now
- Click Save to save the changes
Please note, steps 4, 7 and 8 (changing the session end date) are not required for future sessions, recurring sessions, or sessions that are currently open.
Recording links and access type
If you want users to have access to a Collaborate Ultra recording without having to access the Collaborate Ultra area in your course site, you can generate a link to the recording. However, the recording access setting will need to be changed to Public, even if you are only providing the link in a content area within the same Learning@Griffith course site. To obtain a recording link:
- Navigate to the Collaborate Ultra area in your course site
- Click the burger menu (three horizontal lines) in the top-left of the area, then click Recordings
- Locate the relevant recording, click the ellipses (...) on the right, then click Recording settings
- Tick the 'Allow public access' checkbox then exit the panel
- Click the ellipses (...) on the right for the relevant session again, then click Copy link to copy the link to your clipboard
- Paste the link wherever you will be providing access to the recording
For further information about recordings and recording management, please visit Blackboard’s Recordings support page.
Removing unwanted recording content
There is currently no facility available within Collaborate Ultra for editing recordings or hiding them from student view. Our general recommendation if you would like students to retain access to a recording but edit out certain parts of it is to:
- Download an .mp4 file of the Collaborate Ultra recording to your computer
- Upload the .mp4 file to your Echo360 content library
- Edit out the unwanted parts of the recording using Echo360's built in media editor
- Publish the edited version of the recording to your course's Echo360 section
- Embed or link to the recording within your Learning@Griffith course site
You can then delete the original recording (that contains the unwanted content) from the Collaborate Ultra area of your course site:
- Navigate to the Collaborate Ultra area within your course site
- Click the burger menu (three horizontal lines) in the top-left of the area, then click Recordings
- Locate the recording of interest
- Click the ellipses (...) on the right-hand side, then click Delete
- Click Yes, Delete It to confirm the deletion
Attendance
Session attendance reports
To view attendance reports for a Collaborate Ultra session:
- Navigate to the Collaborate Ultra area in your course site
- Change the Filter by setting on the right to All previous sessions
- For open sessions (i.e. sessions with no end date), this step should not be necessary
- Locate the relevant session, click the ellipses (...) on the right, then click View reports
- Locate the timeframe you wish to view the report for and click View report on the right
From this page, you can view the attendance report from the in-line listing, or alternatively use the Printable and Export to CSV links on the left to generate a printable report or Excel spreadsheet of the attendance report, respectively.
For more information on session attendance reports, please visit Blackboard's Session Reports support page.
Still need help?
Troubleshooting and technical information
For technical and troubleshooting information related to Collaborate Ultra, please visit our Troubleshooting Collaborate Ultra support page.
Related Blackboard support pages
Using Learning@Griffith site navigation
Contact us
A-Z of tools
Your answer may be in our list of tools. Make sure you've clicked around this website to see if your question or issue has already been addressed.
Request assistance
- You can log a Service Request with us online, using the IT support form
- Or, you can phone or email us via the IT Service Centre
Learning@Griffith specialist technical support is available Monday to Friday, 9am - 5pm. At other times, IT Service Centre staff may be able to assist you.
Training
The Learning@Griffith Support Team provide technical support for the Learning@Griffith system. Learning Futures works in partnership with Academic and Administrative elements across Griffith to support the attainment of our Learning and Teaching goals. Visit our Training page for more information on accessing services provided by Learning Futures.
